Terraform AWS deployment
In this new entry, I initiate a series of posts aimed at bringing basic knowledge through to develope infrastructure as code with Ansible and Terraform.
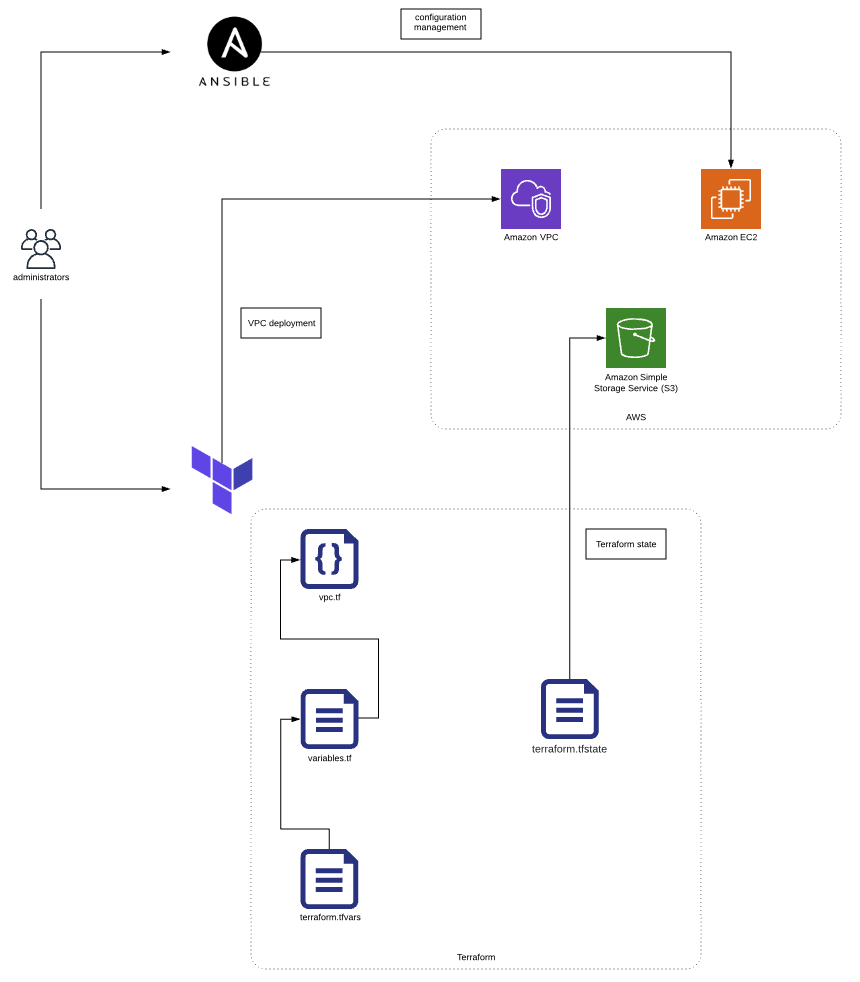
As a first step, the architecture depicted below will be rolled out. This means:
- Terraform installation.
- Ansible installation.
- Creating an AWS S3 bucket as the Terraform backend state storage.
- Creating an AWS Dynamodb for access locking.
- Deploying an AWS VPC using Terraform.

Terraform Fundamentals
I recommend you to read the following guide: https://learn.hashicorp.com/terraform/getting-started/build for getting started with Terraform. In a nutshell, launching resources with Terraform implies four steps:
terraform initto init configuration workspace.terraform planto see output which is going to be executed.terraform applyto actually create terraform resources.terraform destroyto destroy created resources.
Terraform Backend
Terraform is locally executed in your laptop but the state can be stored in different backends. This is pretty helpful when several team members are working on the same infrastructure at the same time. In this case, we are storing the state in a S3 bucket and creating a AWS DynamoDB table which locks the access in order to avoid inconsistencies.
This is our small project folder tree:
.
├── backend
│   ├── dynamodb
│   │   ├── dynamodbbackend.tf
│   │   ├── terraform.tfvars
│   │   └── variables.tf
│   └── s3
│       ├── s3backend.tf
│       ├── terraform.tfvars
│       └── variables.tf
├── terraform.tfvars
├── variables.tf
└── vpc.tf
The s3 folder files will create an S3 bucket which is used to store terraform state.
When constructing your cloud architecture using Terraform, you can dynamically configure your resources using input variables. You must define input variables in a variables.tf file.
You have to specify the variables assigned values. Terraform will source values for input variables in the following three locations:
- Command line. You can set input variable values by passing them directly using the
-varflag. - Environment variables. Terraform will source environment variables that begin with
TF_VAR_ - Files. Using a
.tfvarsfile, you can assign values to your input variables.
In this case, file is the option I have chosen:
terraform apply -var-file=terraform/production.tfvars
As shown below, the terraform.tfvars file contains variables values for the AWS credentials, bucket name, region and tags for identifying my resources.
cat terraform.tfvars

### AWS Credentials ###
#aws_access_key_id="${AWS_ACCESS_KEY_ID}"
#aws_secret_access_key="${AWS_SECRET_ACCESS_KEY}"
profile="personal"

### AWS Terraform Backend ###
s3_backend="terraformbackend"

### VPC Details ###
vpc_region="eu-west-1"

### Tags ###
tag_company_name="garagelab"
tag_environment_name="dev"
The variables.tf file looks as follows:
cat variables.tf
# main creds for AWS connection
#variable "aws_access_key_id" {
#  description = "AWS access key"
#}

#variable "aws_secret_access_key" {
#  description = "AWS secret access key"
#}

variable "profile" {
    description = "AWS credentials profile you want to use"
}


########################### Tags            ##################################

variable "tag_company_name" {
  description = "Company name"
}

variable "tag_environment_name" {
  description = "Environment name where resources are deployed"
}

########################### S3 Bucket backend Config ##################################

variable "vpc_region" {
  description = "AWS region"
}

variable "s3_backend" {
  description = "S3 Bucket where the Terraform state is stored"
}
Finally, the s3backend.tf file constains the instruction for creating the S3 bucket.
cat s3backend.tf

provider "aws" {
  profile = "${var.profile}"
  region = "${var.vpc_region}"
}

resource "aws_s3_bucket" "bucket" {
  bucket = "${var.s3_backend}"
}
Once terraform plan is executed, the AWS S3 bucket is created.

Similarly, the Dynamodb folder content creates a dynamodb table which is used for locking terraform configuration execution.
cat terraform.tfvars
### AWS Credentials ###
#aws_access_key_id="${AWS_ACCESS_KEY_ID}"
#aws_secret_access_key="${AWS_SECRET_ACCESS_KEY}"
profile="personal"

### AWS Terraform Backend ###
dynamodb_table_backend="terraform-backend-lock"

### VPC Details ###
vpc_region="eu-west-1"

### Tags ###
tag_company_name="garagelab"
tag_environment_name="dev"
cat variables.tf
# main creds for AWS connection
#variable "aws_access_key_id" {
#  description = "AWS access key"
#}

#variable "aws_secret_access_key" {
#  description = "AWS secret access key"
#}

variable "profile" {
    description = "AWS credentials profile you want to use"
}

variable "vpc_region" {
    description = "Region for deploying resources"
}


########################### Tags            ##################################

variable "tag_company_name" {
  description = "Company name"
}

variable "tag_environment_name" {
  description = "Environment name where resources are deployed"
}

########################### Dynamodb Table Config ##################################

variable "dynamodb_table_backend" {
  description = "Dynamodb table for backend locking"
}
cat dynamodbbackend.tf
provider "aws" {
  profile = "${var.profile}"
  region = "${var.vpc_region}"
}

resource "aws_dynamodb_table" "terraform_state_lock" {
  name           = "${var.dynamodb_table_backend}"
  read_capacity  = 5
  write_capacity = 5
  hash_key       = "LockID"

  attribute {
    name = "LockID"
    type = "S"
  }
}
Let´s execute terraform in order to create the Dynamodb table.
terraform apply

An execution plan has been generated and is shown below.
Resource actions are indicated with the following symbols:
  + create

Terraform will perform the following actions:

  # aws_dynamodb_table.terraform_state_lock will be created
  + resource "aws_dynamodb_table" "terraform_state_lock" {
      + arn              = (known after apply)
      + billing_mode     = "PROVISIONED"
      + hash_key         = "LockID"
      + id               = (known after apply)
      + name             = "terraform-backend-lock"
      + read_capacity    = 5
      + stream_arn       = (known after apply)
      + stream_label     = (known after apply)
      + stream_view_type = (known after apply)
      + write_capacity   = 5

      + attribute {
          + name = "LockID"
          + type = "S"
        }

      + point_in_time_recovery {
          + enabled = (known after apply)
        }

      + server_side_encryption {
          + enabled = (known after apply)
        }
    }

Plan: 1 to add, 0 to change, 0 to destroy.

Do you want to perform these actions?
  Terraform will perform the actions described above.
  Only 'yes' will be accepted to approve.

  Enter a value: yes

aws_dynamodb_table.terraform_state_lock: Creating...
aws_dynamodb_table.terraform_state_lock: Creation complete after 5s [id=terraform-backend-lock]

Apply complete! Resources: 1 added, 0 changed, 0 destroyed.
The Dynamodb table appears in the AWS console.

Completing the steps above, our backend is ready to store the Terraform state.
AWS VPC Deployment
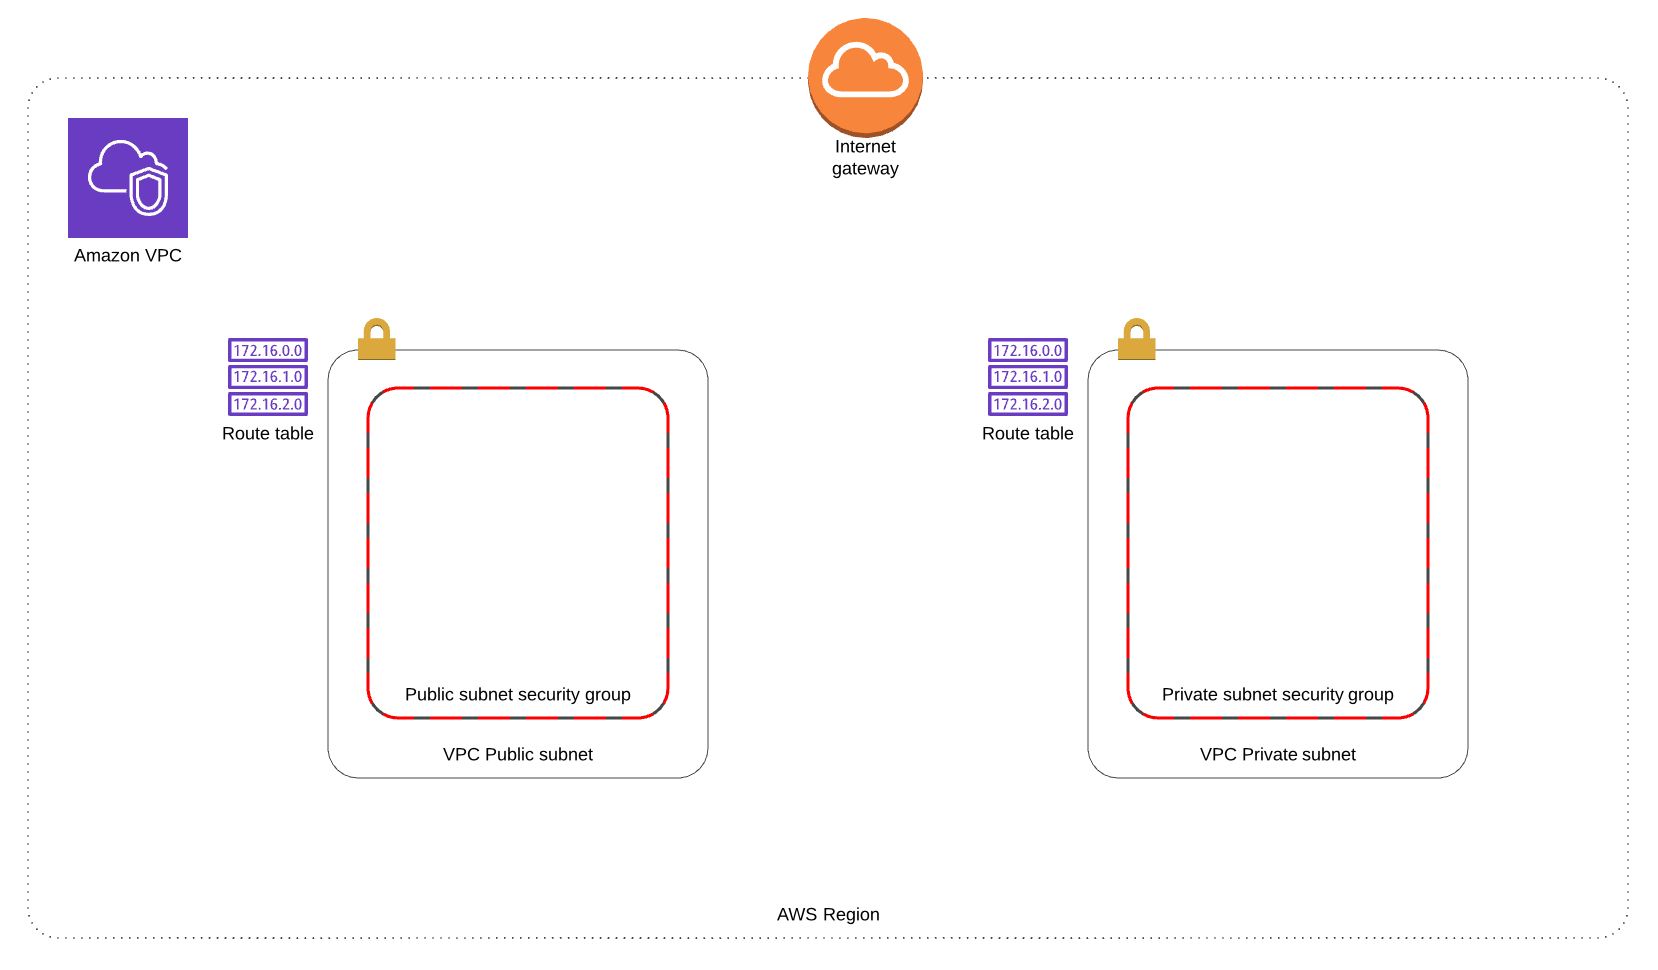
The Terraform backend is ready so it´s time to create the VPC resources, which include:
- Internet gateway for the Internet access.
- Public network.
- Private network.
- Route table for public subnet.
- Route table for private subnet.
- Security group for public subnet instances.
- Security group for private subnet instances.

This is the piece of code which creates the resources described above.
cat vpc.tf
# Setup our aws provider
provider "aws" {
  #access_key = "${var.aws_access_key_id}"
  #secret_key = "${var.aws_secret_access_key}"
  region = "${var.vpc_region}"
  profile = "${var.profile}"
}

terraform {
  backend "s3" {
    bucket = "${var.s3_backend}"
    key = "terraform"
    region = "${var.vpc_region}"
    dynamodb_table = "${var.dynamodb_table_backend}"
  }
}

# Define your VPC
resource "aws_vpc" "vpc_name" {
  cidr_block = "${var.vpc_cidr_block}"
  tags = {
    Name = "${var.vpc_name}"
    Environment = "${var.tag_environment_name}"
  }
}

# Internet gateway for the Internet access
resource "aws_internet_gateway" "igw" {
  vpc_id = "${aws_vpc.vpc_name.id}"
  tags = {
    Name = "${var.igw_name}"
    Environment = "${var.tag_environment_name}"
  }
}

# Create a Public subnet
resource "aws_subnet" "vpc_public_sn" {
  vpc_id = "${aws_vpc.vpc_name.id}"
  cidr_block = "${var.vpc_public_subnet_1_cidr}"
  availability_zone = "${lookup(var.availability_zone, var.vpc_region)}"
  tags = {
    Name = "${var.vpc_public_sn_name}"
    Environment = "${var.tag_environment_name}"
  }
}

# Create a Private subnet
resource "aws_subnet" "vpc_private_sn" {
  vpc_id = "${aws_vpc.vpc_name.id}"
  cidr_block = "${var.vpc_private_subnet_1_cidr}"
  availability_zone = "${lookup(var.availability_zone, var.vpc_region)}"
  tags = {
    Name = "${var.vpc_private_sn_name}"
    Environment = "${var.tag_environment_name}"
  }
}

# Routing table for public subnet
resource "aws_route_table" "vpc_public_sn_rt" {
  vpc_id = "${aws_vpc.vpc_name.id}"
  route {
    cidr_block = "0.0.0.0/0"
    gateway_id = "${aws_internet_gateway.igw.id}"
  }
  tags = {
    Name = "vpc_public_sn_rt"
    Environment = "${var.tag_environment_name}"
  }
}

# Associate the routing table to public subnet
resource "aws_route_table_association" "vpc_public_sn_rt_assn" {
  subnet_id = "${aws_subnet.vpc_public_sn.id}"
  route_table_id = "${aws_route_table.vpc_public_sn_rt.id}"
}

# Create security group for public subnet instances
resource "aws_security_group" "vpc_public_sg" {
  name = "public_security_group"
  description = "Public access security group"
  vpc_id = "${aws_vpc.vpc_name.id}"

  ingress {
    from_port = 22
    to_port = 22
    protocol = "tcp"
    cidr_blocks = [
      "${var.vpc_access_from_ip_range}"]
  }

  ingress {
    from_port = 0
    to_port = 0
    protocol = "tcp"
    cidr_blocks = [
      "${var.vpc_public_subnet_1_cidr}"]
  }

  egress {
    # allow all traffic to private Subnet
    from_port = "0"
    to_port = "0"
    protocol = "-1"
    cidr_blocks = [
      "0.0.0.0/0"]
  }
  tags = {
    Name = "public_security_group"
    Environment = "${var.tag_environment_name}"
  }
}

resource "aws_security_group" "vpc_private_sg" {
  name = "private_sg"
  description = "Security group to access private network"
  vpc_id = "${aws_vpc.vpc_name.id}"

  # allow postgres port within VPC
  ingress {
    from_port = 5432
    to_port = 5432
    protocol = "tcp"
    cidr_blocks = [
      "${var.vpc_public_subnet_1_cidr}"]
  }

  # allow mysql port within VPC
  ingress {
    from_port = 3306
    to_port = 3306
    protocol = "tcp"
    cidr_blocks = [
      "${var.vpc_public_subnet_1_cidr}"]
  }

  egress {
    from_port = "0"
    to_port = "0"
    protocol = "-1"
    cidr_blocks = [
      "0.0.0.0/0"]
  }
  tags = {
    Name = "private_security_group"
    Environment = "${var.tag_environment_name}"
  }
}

output "vpc_region" {
  value = "${var.vpc_region}"
}

output "vpc_id" {
  value = "${aws_vpc.vpc_name.id}"
}

output "vpc_public_sn_id" {
  value = "${aws_subnet.vpc_public_sn.id}"
}

output "vpc_private_sn_id" {
  value = "${aws_subnet.vpc_private_sn.id}"
}

output "vpc_public_sg_id" {
  value = "${aws_security_group.vpc_public_sg.id}"
}

output "vpc_private_sg_id" {
  value = "${aws_security_group.vpc_private_sg.id}"
}
In the following blog entries, we will dig further into the Terraform option as well as how interwork with Ansible for configuration management purposes.